Pages

2010-11-07

M45 wide field and 100% crop

The result of stacking after processing, but before cropping. Processed to enhance the stars.

M45 widefield


There is still some vignetting despite the use of flats, and some banding from the sensor is visible as I stretched the image to pull out the nebulosity.

M45 100% crop


The stars were trailed due to poor alignment. "Fixing" them in Photoshop has helped, but they are still not round.

2010-11-06

M45: The Pleiades

The Pleiades or Seven Sisters, number 45 in Charles Messier's catalogue of nebulae is a well known asterism and nebula in the constellation of Taurus (the Bull) and is visible in the autumn and winter skies. I took this image at the end of last year in Langkawi in Malaysia.

The Pleiades


Olympus ZD-150/2 lens @ f/2.0 on E-620. Kenko SkyMemo-R mount. Pre-processing in IRIS, post-processing in Photoshop CS5.

I'm still learning how to process images. It's hard.

2010-11-05

Things are Awesome

So a couple of weeks ago I was sitting have breakfast and browsing the web on my iPad, when the (free!) 3D Sun app decided to interrupt to tell me about a large Coronal Mass Ejection on the Sun. I then switched to this app and was able to see photos of the Sun, in various wavelengths including X-rays. These photos come from STEREO, which allows us to see more than one side of the Sun. I was also able to download videos of the CME.

Think about that. I got notification of a huge event (and I mean huge - many times the size of the Earth) on the Sun that we didn't even know about until relatively recently. I'm not some astrophysicist at NASA or another national space agency, I"m not even a researcher in astronomy in general. I'm just a guy with an app. An app that allows me to see videos in fecking X-rays of the Sun. The views from the telescopes on two spaceships are automatically combined to form an image on a globe that I can rotate and look at as a 3D object. All of this while sitting at home drinking coffee and eating toast.

How awesome is that?

I am typing this on my new (shiny shiny) MacBook Air, while my Roomba (a robot) is hoovering the apartment. The Roomba  does this everyday at 8:00am and then goes back to its charging bay ready for the next day. You probably didn't stop to think about the "browsing the web" phrase in the first sentence. From my computer I can keep up with events and current research from all over the planet, see videos and photos from that people I don't know from all over the world. Likewise I can easily share photos and videos. In addition, I have available to me a large portion of the world's knowledge (for good and bad). I can do all this while enjoying a coffee without leaving my chair.

How awesome is that?

Not only can I do all of this, I can look forward to a much longer, healthier and happier life due to improvements in medicine and healthcare.

This is a few examples of "teh awesome". This is the best time to be alive.

Yay for science, yay for engineering, yay for geeks.

We're screwed when Peak Oil kicks in, though.

2010-10-25

2010-09-20

AR 1108

Active Region 1108

Some basic processing with some frames captured this morning.

Seeing: III

Equipment: LOMO Astele 133.5 @ f/10, DMK21AF04, Baader white light solar film, IDAS LPS-V4, Kenko R1 Pro, Takahashi EM-200 T2Jr

Processing: Astro IIDC (capture), Keith's image stacker (align, stack), PS CS5 (post-processing), no wavelet processing

2010-09-02

Baader MaxBright T-2 binoviewers

Initial Impressions & Thoughts


This post was initially a response on a singastro forum, but was so long, I thought I may as well blog it.

From Teleskop Service in Germany, I bought:

  • The Baader Maxbright binoviewer kit with 1.25x glass path corrector and 1.25" nosepiece.

  • Zeiss Jena 90 degree prism T-2


This is the first time I've used Teleskop Service. Good prices, easy to use site, same day shipping and everything was packaged well. Very happy with their service.

From Starbase in Tokyo.

  • 2x 18mm Takahashi orthos (24.5mm)

  • 1x 12.5mm Tani ortho (24.5mm). I already have another 12.5mm


Great service as per usual.

On opening the binoviewer and parts


The binoviewer is nicely made, with coatings well applied. The tension is just right, and there is a fair amount of focus travel for each eyepiece. The helical focussers for the eyepieces are smooth. On the prism, however, I was surprised to see a tiny chip on one surface. I doubt this will have much, if any effect, but still, I'd expect it to fail QC, especially with the Zeiss prism being the more expensive option. There is a plastic ring on the male threaded side of the prism. This ring is there to provide some gradual pressure when you tighten the thread, and worked well with some T-thread accessories I tried. However, to fully screw the prism to the binoviewer, I had to remove this ring. Without the ring the binoviewer jams and "gives" suddenly. This is a bit disappointing.

Also, there is the usual Baader problem of 'sticky' threads. Every Baader filter I've ever had has had the threads very slightly off. Not sure why this is, but again the prism and binoviewer have this problem.

The 31.7->T adapter is well made and has a 34mm thread internally to attach the glass path corrector. This works well.

First light


Of course it was cloudy when I got all the parts delivered and I couldn't try them out on the sky. I just looked at some far-off buildings and lights. So, these are fairly useless initial impressions.

I tried the binoviewer and prism on my FSQ-85ED, which has a lot of back-focus (>200mm) to support long imaging trains. The adapters for visual use take up some of this, quite a bit as it turns out.
There are basically two configurations:

  1. Binoviewer - corrector

  2. Binoviewer - prism - corrector


With 1, I could get focus with the 18mm orthos. But with a Televue maxbright 1.25" diagonal inline I couldn't get focus.

I then tried configuration 2, and couldn't get focus. I changed the Tak 2"->1.25" adapter set (which takes up about 30-40mm or so) to the low profile adapter, and was able to get focus. There was quite a lot more back focus available when using 31.7mm eyepieces, so I could probably just use the normal adapter. This setup is close to the stated requirements.

  1. The quality of the machining shows - I had no problem fusing the image and getting good focus for each eye

  2. Very nice, high contrast, sharp images

  3. Some lateral colour

  4. Some softness at the edge of the field

  5. Internal reflections


By far the worst and most intrusive was 5: internal reflections. This was very, very bad. Far worse than any I've seen in cheap binoculars. In daytime viewing, this will probably lead to reduced contrast. It's probably not much of an issue when viewing star fields, but these reflections will probably cause problems viewing the Moon. These were so obvious and so bad, I'm curious if there's something weird about my setup. I can't think what it would be - they were visible with or without the prism.

Point 4 is worrying, but I need to try this setup under the stars to see what's going on. There's certainly no field curvature on the Q, but it's possible the light cone is still a bit too steep for the orthos, or even the prisms.

Some things to heed:

  1. The Tak 31.7->24.5 adapters are nice, but take up even more back focus. DOH. So, don't do what I did. Use 31.7mm eyepieces.

  2. The Baader T-2 prism allows you to connect the binoviewer with the minimum increase in light path. I'd recommend this, or another T-thread diagonal.

  3. You will almost certainly need one of the glass path converters. Unless you're using something like a Borg, Tak Sky-90/Q or other scope with a lot of back focus, you will need a corrector with magnification higher than 1.25x.

  4. The entire setup is quite heavy and greatly increases the moment on the rear of your scope (assuming a refractor or compound).

  5. Due to the weight, you're not going to be able to use heavy eyepieces. If you want to do this, it would make sense to do so on a larger scope and get the more expensive Mark-V binoviewer.

  6. I've not tried the setup with my Mak or Mewlon yet, but I'm worried about the ergonomics. It looks like the scope might get in the way. There is a 45 degree Amici prism that may be more suitable.

  7. Eye placement seems to be more critical than with a single eyepiece.

  8. SCT owners are going to focus way, way off from where the system is optimised. Expect even worse off-axis performance than usual, and probably some SA on axis.

  9. The system diagram I got was for the older binoviewer system which was not T-2. There are some configurations not possible with the T-2 system, and others that are no longer necessary. This might lead to confusion.

2010-08-08

Borg 71FL is pretty damn good

Here is a post with a photo that shows some Fresnel rings. I need to do a proper Roddier test, but it's looking pretty good.

2010-07-19

Review of the Nikon 180/2.8 ED Ai-S

I think this is one of the best value lenses out there for widefield astrophotography. Jerry Lodriguss has put up a review of this lens on his blog, "Catching the Light". Check out his site for his very clear articles and books on beginning astrophotography.

QHY8 reprise

In a previous post, I wrote about the trouble I had with my QHY8.

So, I spent a bit of time fiddling with the QHY8 getting the CCD square to the front plate. I adjusted the rear screws and was able to get the CCD square according to my measurements. But no matter how I changed the tension, I couldn't see any difference in sample images - there was still frame-wide "coma" aligned with the CCD.

At first, I was making small adjustments to the height of the corners of the CCD - 0.2mm max. I decided to make gross movements instead, and didn't see any change in the test images. Aha! Something else is going on. It turned out to be "tearing" in the image introduced by software. The QHY8 is supported with a custom driver under Nebulosity on the Mac. Unfortunately, these seem to have some problems. After trying Nebulosity under Windows with the official QHY drivers, I finally got a very nice test image with a flat field. Nothing is perfect though, I have to reinstall the drivers frequently.

When playing around with the CCD alignment, I noticed that the cold finger the CCD is on is levered on one side. This is the side with one spacer on top of a component. I took out the screw I previously put on the right hand side, straightened the spacer and put it on the right hand side. When I reassembled the CCD, the CCD was pretty much perfectly aligned!

If the clouds of the past two months clear, hopefully I will get some imaging done with the QHY8.

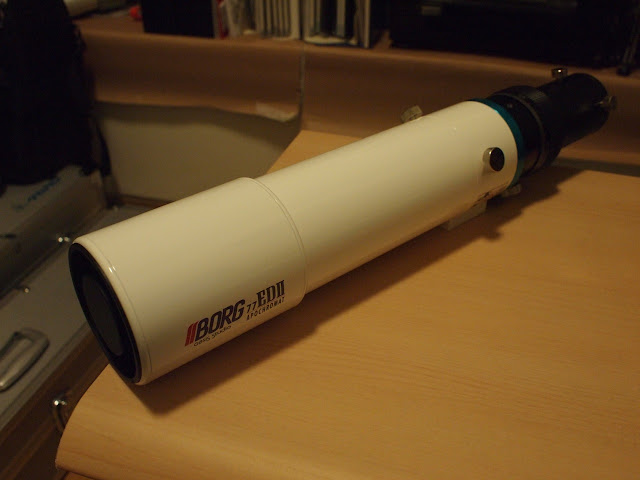
Borg 77EDII

Note

I originally wrote this post back in November 2009, and it has languished as a draft. Since then, I've added the 135mm tube (7135) that allows use of the f/4 ED reducer and the new 0.78DGT triplet reducer (7878).

My new Borg 77EDII (available from Hutech outside of Japan) arrived today from Starbase.

Borg unboxing

The 77EDII package (6000 and 2178) comes with a drawtube, helical focusser, two M57 extension tubes (7509, 7508) that also allow use of 2" accessories, and a T-ring adapter (7522). The tube has a clever flat mount area that can be used to attach the scope to a tripod, or to attach a finder mount or other accessories.

Borg bits

Both the tube and the lens assembly come with caps for use when the scope is broken down for transport. Nice. I would've liked these for my 125SD - there is not even the option to buy them separately. The lens cell doesn't appear to be adjustable, but looks like it will accept 77mm filters (note it doesn't, you can use 82mm filters if you take the nameplate off, see here). The lens hood is retractable, but doesn't slide into place with a satisfying click, as the Pentax 75SDHF does, or have a screw to hold it in place, like the Tak Sky-90 and FSQ-85ED. However, the hood is small and light, so I don't think it being held in place by friction will be a problem.

Objective

In addition I bought the 80mm rings (7080), the plastic clamshell (5503) and a Vixen-style finder mount (7755n). I also added one accessory that currently seems to be available only in Japan, the Yuetsu-27g base ring from Scopelife. This is the well-machined (カワセミ or "Kingfisher") blue ring in the photos. This provides a tighter fit around the extensible draw tube and reduces sag. I became aware of this accessory through the Borg "topics" blog (Japanese). Note the blog is now at http://www.tomytec.co.jp/borg/world/blog/.


The flexibility and value for money of Borg scopes and accessories seems to increase the more you buy. I can use the M57 FeatherTouch focusser and MDX "helicoid" with ED F4DG reducer for my 125SD on the 77EDII with no problem. I think I can also use the 0.85x DG (7885) and 0.66x DGT (7866)  reducers for the mini-Borg series that I have for use with my 60ED. Both of these reducers are usable up to 500mm focal length, only cover an APS-C sized sensor, but have the advantage of being tiny.

Ready to go, anywhere

Compare this to my Taks. I have a 35mm reducer, (separate) 35mm flattener and 1.6x extender specific to the TOA-130/150, the 0.73 reducer ED and 1.5 extender ED for the FSQ-ED and Sky-90 reducer and Extender-Q for the Sky-90 and FSQ. To be fair, the extenders can all be used with other scopes - I think. And with some ingenuity some of the reducers can be used on other scopes, but not easily.

With the F4DG reducer, the focal length of the 77EDII is around 330mm at f/4.3. On a 35mm full frame this is just over 6 by 4 degrees, with a 7.5 degree diagonal. This should provide nice wide-field images. For H-alpha, the Olympus 250/2 and 250/2.8 have the advantage of speed, though at the cost of weight. The Pentax 645 300/4 provides a comparable FOV at a comparable weight, but the Borg's flexibility would have it win for a trip. Anyway, it will be fun to try them out and compare.

I missed out on the Borg 0.85x DGL reducer/ (7887) for 35mm full-frame, so will wait and pick up the 0.78x triplet reducer when it becomes available. I recently managed to find the fairly rare 35mm 1.04x flattener (7784) on Yahoo Auction in Japan, which I will pick up over the New Year holiday. This set of reducers/flatteners will give 330, 395 and 530mm focal lengths on a full 35mm frame. Surely in terms of flexibility, this has to be one of the best small portable photo-visual refractors available?

The 77EDII is pretty large compared to the 60ED when assembled.


Borg 2010X2 is a 71mm fluorite

The new Borg 71 FL is out. It can be used with the mini-Borg tubes/accessories as well as the 80mm diameter tubes. The first batch of 100 has nearly sold out already. I lasted all of two days without ordering one.

It's 400mm f/5.6. With the 0.66 DGT reducer, this will be 264mm @ f3.72, roughly 4.8 by 3.2 degrees on an APS-C sensor. With the 0.85 DG reducer, 340mm @ f/4.69, which is 3.7 by 2.5 degrees.

2010-06-04

More Mizar Mystery Mini Mount Mods

So, last night I bought a socket set, including a 17mm socket allowing me to fully disassemble the RA shaft on the Mizar mini-mount. The shaft is straight, but the hole in the Dec unit that the RA shaft screws into is at a slight angle. After cleaning the head of the shaft, it was clear there was some old washer/shim that had deteriorated over time.

I tried some rubber and metal washers, but didn't have any luck. I then made a shim from aluminium foil. This worked well when I screwed the shaft in by hand. I cleaned and greased everything and reassembled the mount, but there was no improvement! After some swearing and then a bit of investigation, I realised tightening the shaft hard torn the foil shim and spread it out.

After a bit of thinking, I realised the opposite of shimming was to remove material. So, the opposite opposite (i.e. same) effect could be achieved by filing down the base of the shaft opposite to where I had placed the shim, and also angling the sides perpendicular to this. I did this gradually, frequently checking the angle after some filing by screwing the shaft in tightly. I could see an improvement and eventually got it pretty straight. I filed off about 0.5mm.

I then cleaned and greased the RA shaft, greased the worm wheel and put it all back together. The RA shaft is now quite square to the Dec unit. Previously the RA circles were being pinched by the Dec unit due to the misalignment and could get stuck in place instead of moving with the RA shaft. This is now fully fixed, and the action of the RA setting circle is good - smooth and loose enough to move easily, but with enough stiction not to slip. So, now I have more accurate "push-to". The new grease improved rotation about the RA shaft itself, and is now very smooth.

The RA shaft has a simple but effective little "bearing". It is just 4 washers, with grease between each, behind the bolt holding the shaft in place. Re-greasing these led to smoother rotation and the ability to tune the shaft tension more finely.

Looking at the Orion site, the EQ-2 mount seems to be similar to this mount. Mizar had a smaller mount that the EQ-2 looks very, very similar to. My little mount is a bit more sturdy at the same weight. If you are having problems with an EQ-2 mount, it may be worth pulling it apart to check if the RA shaft is misaligned rather than bent. Obviously this is at your own risk.

Unfortunately I forgot to take photos of the disassembled mount and tear-down/rebuild process. It's very simple. The mount is nicely engineered apart from this misalignment.

I cleaned the whole mount with WD-40 and all the chromed parts with Brasso. It's looking pretty good:


On the near side of the RA unit, you can see, from left to right, a chrome bolt, a lever and a gear. This is clearer in a photo from the auction:

Mizar mount auction photo rhs

It seems likely that the chrome bolt is there to mount an optional RA motor drive, with the lever for some mechanism to (dis)engage the smaller gear(s) that would connect to the large gear.

You can also see the Dec knob points down towards the rear. So, when the mount is moved around RA, the Dec knob collides with the gear. Removing the lever and gear helps, but the Dec handle still collides with the RA worm shaft. Unlike other mounts, the Dec handle does not rotate with the Dec shaft, so this collision happens regardless of Dec.

Also, on the other side, again in a photo from the auction, you can see the RA knob:

Mizar mount auction photo lhs


Again, the RA worm shaft does not rotate with the RA shaft, but remains in place. This protudes quite a way, and the Dec worm shaft collides with it when rotating the RA shaft in the opposite direction.

Removing the chrome gear revealed that the inside of the worm shaft was threaded for an M4 bolt. This makes it possible to use a different knob to turn the shaft. The Dec worm shaft didn't look to be threaded, but after screwing a bolt in with some WD-40, it was clear that it too is threaded for M4.

I upgraded my Takahashi TOA130F with the MEF-4 micro focuser, and my Sky-90 with the MEF-3 micro focuser, so I had two spare Takahashi focusser knobs. I got some M4 nuts and bolts from a local hardware store and attached the Tak knobs:

Mizar mini-mount with Tak knobs

Mizar mini-mount with Tak knobs rhs

Now there is complete clearance to rotate the mount fully in both RA and Dec. The only limiting factor is the telescope itself, but now I can track past meridian, and the mount is easier to use.

The other major modification I can think of would be to add a motor. To do this, I need to re-attach the gear and mount the motor on the rhs. Fortunately the RA and Dec worm assemblies are asymmetric. If I swapped them, I would be able to have the Tak knobs on the other side, allowing me to have a motor on the rhs.

The mount has fairly simple bushings, which could be improved by teflon bushings, but it's already very smooth.

I was able to use the mount for a short while last night to find some doubles in the haze between the clouds with a Pentax 75-SDHF. It is very rigid, with damping times less than 0.5 seconds, without the use of any damping pads. I'm not very practiced with old-fashioned setting circles, but I was able to find targets far (greater than 10 degrees) from nearby bright stars that were not visible to the naked eye. Scanning RA in the finder and at low powers, and using binoculars to get context also helps. Each goto is more effort and a bit slower than with an automatic mount but the set up time is minimal, so I can spend more precious time before the clouds come in.

So, this old, cheap little mount is now back in good condition and very usable.

Crepuscular Rays at Sunset


Storm clouds rushed in over the north of Singapore just before sunset, causing some nice crepuscular rays, the heavier, taller clouds to the right had flashes of lightning between the clouds.

2010-06-01

Push-to versus Push-to classic

The weather is quite changeable here in Singapore, making anything other than "quick peeks" frustrating. So, I decided to try to get the most out of my quick peeks. I wanted a small lightweight mount that I can easily travel with in a taxi, that I can use for 20 minutes on the balcony, and that minimises the time spent finding objects . I already have a Vixen Sphinx, which is nice for a weekend trip, but I find it a bit too much trouble for a quick peek or a taxi ride for a night's viewing.

I sold my much-used Vixen Porta after replacing it with a Takahashi TG-L, which can take larger scopes. This is a nice alt-az mount for quick-peeks, but star-hopping can be time-consuming. The sky is so bright that you have to start from a very bright star, often resulting in a very long chain of hops.

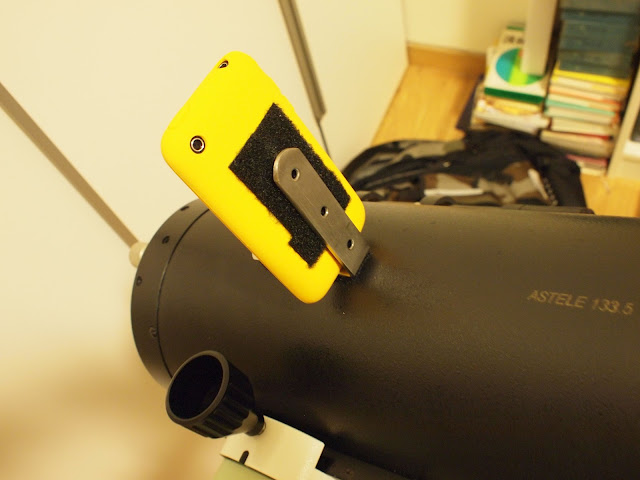
Recently, I tried out a few astronomy apps on the iPhone. These allow using the compass to find objects in the sky, so I put together a simple bracket to hold my iPhone on a scope. I wanted a flexible rubber iPhone case to easily get the iPhone in and out of. I got the loudest colour I could find to help finding the thing in the dark in case I dropped it. Some of the apps require shaking the iPhone or moving it in a figure of 8 to calibrate the compass. So, I wanted to be able to remove it form the mount easily - so velcro!

High-tech mounting

iPhone push-to


iPhone push-to in action

This failed miserably.

The software works well, and is useful and fun, for wide field views at arms length, but doesn't recognise small movements. It can also be very inaccurate. The error was more than 20 degrees in some cases. I wasn't expecting high accuracy, especially with the iPhone attached with velcro, but I was hoping to get the target in the finder FOV. I tried various apps, but they all showed the same inaccuracy and lack of sensitivity to small movements.

So much for the simple, inexpensive hack.

I had already been thinking about getting a small equatorial mount with setting circles. The Vixen GP is light, but slightly too large. The Tak P2-Z would be great for astrophotography, but is too heavy and is also expensive. My Kenko Skymemo-R is great for portable astrophotography with a small scope or lens, but isn't much fun to use visually. It lacks slow motion controls, setting circles and doesn't have much clearance.

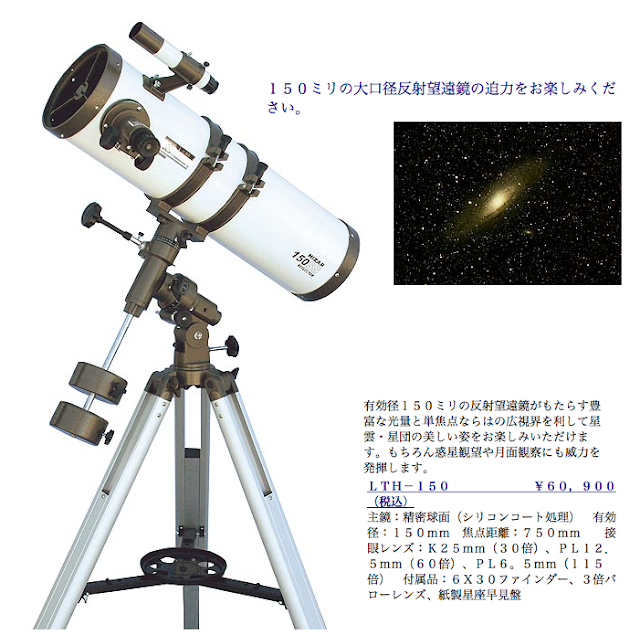
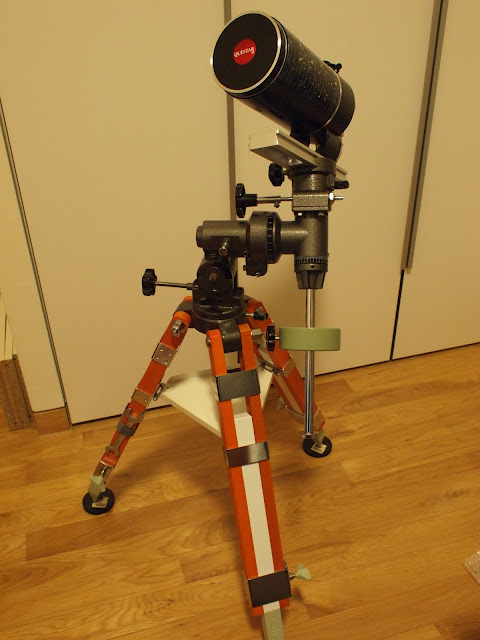
An old mount came up on Yahoo auction in Japan at a low price. I ignored it for weeks, but eventually gave in and bought it. It looks very similar to the older Mizar mounts on their page, but I'm not 100% sure what this mount is or how old it is.

The source of the mystery mini-mount?

The mount came with a 2kg counterweight, but for smaller scopes, the 1.5kg weight for my Kenko Skymemo (pictured) is fine. I bought the Takahashi FC-S legs from Starbase in Tokyo. Yamamoto-san was very helpful and sent the little mount to me with the FC-S legs. The mount is usable from 0-90 degrees without the need for a half-pillar. I like the retro look.

Mizar mystery mini-mount

This setup, including couterweight, feels lighter than the TG-L. For trips in a taxi, it should be fine to just carry the mount with the counterweight and shaft in a rucksack. The whole thing should also fit in a fairly small case for airline travel.

The mount was in very good condition, but needed some lubrication. I took the mount apart and mixed small amounts of WD-40 with the old grease. The previous owner seemed to have overtightened everything, so I also adjusted the worm gears and shaft tension. Now, everything is very smooth. Unfortunately, the RA shaft is not perfectly square with the mount. The mount doesn't seem to have been dropped and the shaft doesn't seem to be bent. It's possible it is a manufacturing problem, or that the shaft is not seated correctly. The washers holding the RA shaft on are considerably off-centre, so it should be possible to improve the alignment. I couldn't disassemble the RA shaft completely as I don't have the right size of socket. I'll probably get a socket and try to straighten out the shaft, but it is perfectly usable as is.

Of course, it is cloudy, so I've not had a chance to try out this new mount.

Other options would be something like the iOptron or Sky-Commander. These are expensive, limited to visual only use, require batteries and are useless if power runs out or the electronics develop a problem. So, I think I'll stick with my old-fashioned mount for now.

Now I can get on with going through my observing lists of double stars and tracking some variables stars.

2010-05-24

Dave Mitsky's Doubles for April

I've uploaded a new sheet with the doubles listed for April 2008/2009, with J2000.0 co-ordinates and SAO numbers added by Herbert Kraus.

I've changed the format to include some extra fields that allow filtering and sorting. I maintain this list using Numbers on a Mac. Unfortunately the formulae to convert the RA/Dec coordinates to numerical values (to allow sorting/filtering) could not be exported, so I've just exported the values. The original Numbers sheet is available.

Worth noting is that the co-ordinates are epoch J2000.0, and many of these stars have high proper motion. Good sky chart software should correct for proper motion, parallax and even precession.

I intend eventually to put these lists in a database, allowing me to use the SAO catalogue to add more data such as proper motion.

I double check the coordinates, but there may be errors. Corrections, criticism and comments are gratefully received.

2010-05-05

2010-04-13

Mars 2010/1/28

Mars on the evening of 28th January 2010.

I have more data to process, and this is RGB only, I didn't include the luminance.

Mars 2010/1/28

Details:

  • Celestron C8, Tak TOA 1.6x extender, Televue 2.5x Powermate for roughly f/40
  • Vixen SXW
  • DMK21AF04 mono camera, Astronomik RGBL filters
  • Capture: AstroIIDC
  • Stacking: Keith's Image Stacker
  • Final editing in Keith's Image Stacker and Photoshop CS3

2010-02-14

Dave Mitsky's Double and Variable Stars for February

I've uploaded a sheet to Google docs, with the list of double and variable stars from Dave Mitsky's post to the ever-useful astromart, with details added by Herbert Kraus. I might get around to doing lists for SkyTools Pro and Astromist.

2010-01-27

Some notes on viewing Mars with different scopes

Having gotten fed up with the number of failed imaging attempts recently, and with Mars being near opposition, I've been having "quick peeks" with some of my scopes, and using some of my heavier scopes for observing Mars.

Recently I've viewed Mars with:

  • Takahashi FCT-125 on Vixen SXW

  • Takahashi TOA130F on EM-200

  • Celestron C8 on TGL alt-az

  • Borg 125SD on TGL alt-az

  • Celestron C11 on EM-200


I generally used Pentax XW eyepieces, though I also tried a 5mm ortho, which may have been slightly better than the XW-5. I used a Tak 2" diagonal. On both the C8 and C11, I use a Borg helical focuser for fine focusing. This helps a lot. Comparisons were done at magnifications as similar as possible. I also tried to find the best magnification for the scope and conditions.

The C8 on an alt-az mount is a nice "grab'n'go" scope. As I currently live in Singapore, there is virtually no time needed for cool-down, or rather, warm-up, and temperatures stay very constant throughout the night. I no longer have to worry about those annoying tube currents. Also, the planets and Moon reach high in the sky here, so the C8's sensitivity to seeing is lessened. Overall Singapore is a good place to own an SCT or other compound scope. You will want the aperture to help with the light pollution.

The C8 shows an annoyingly large bright halo around Mars, and contrast could be better. The edges of the planet are a little soft, and the colour is a very washed out orange-ish pink. Detail is good with the planet near the centre of the FOV, but drops off quickly towards the edges. I compared the Borg 125SD on the same night. At higher magnifications, lateral colour shows up off-centre and is quite intrusive. There is no annoying halo, and the planet shows good detail, nice contrast and the disk has has nice crisp edges. The 125SD snaps to focus well. Overall I'd say I'd prefer the C8 on an alt-az mount. I previously tested the C8 versus the 125SD on Jupiter when I lived in Tokyo, and the 125SD was sightly better, mainly due to contrast - but this was on my EM-200, so the planet was kept dead centre, and I was viewing a shadow transition, where contrast is probably more important. I don't recall colour being an issue with the 125SD and there is nothing about it in my notes. Worth noting is that the 125SD is the only scope I used an extender with - the Tak TOA 1.6 extender, and this was the first time I used this. I intend to try out other extenders to see if there's any difference - I doubt it.

On another night, I compared the TOA130F and the C11. This was my first light of the C11 after I took it apart to re-grease the baffle tube, add flocking to the inside of the tube and clean the primary. I was able to collimate quickly and easily and had nice symmetrical diffraction rings around a roughly mag 7 star. The C11 provides an image that is too bright at "lower" magnifications. At over 400x the contrast and view overall was better - the seeing probably limited resolution to less than these magnifications, but the dimmer image was easier on the eye. The C11 still has the halo that the C8 has, but it was less intrusive - maybe the flocking is helping here? I will add flocking to the C8 to see if it helps. Off-axis performance wasn't an issue as I was using the EM-200. Overall I enjoyed the views through the C11, they have the same "quality" or "feel" as the C8, just more so. The light-gathering power means you have a larger exit pupil, so it's quite comfortable to sit at the eyepiece. I did have to faff around with focussing a bit, however, and the edges of the planet were still a little soft.

The TOA130F is simply an amazing scope. There is no false colour, image contrast and sharpness is incredible. Mars snapped to focus and I didn't have to play around with anything, just sit there and enjoy the view. The disc has razor-sharp edges, great contrast and great detail. I used the TOA before the C11 when Mars was lower in the sky, probably around 50 degrees, and the C11 later when Mars was higher - over 70 degrees. The C11 did show more detail in the few seconds of great seeing that came and went, but I was surprised how poor the contrast was compared to the TOA. Also, I felt I had to try harder to see the same detail in the C11 at equivalent powers. For visual viewing, I preferred the TOA overall, which surprised me - I expected the C11 to be better. The C11 is definitely a very nice planetary scope. The fact that the TOA, with less than half the aperture is so close to the performance of the C11 just goes to show how great this scope is. I didn't compare the TOA to the C8 on the same night, but from memory, the TOA is far, far better than the C8.

Seeing was not good the night I tried out the FCT-125, it was earlier in the evening, so Mars was low and I didn't compare it against any other scopes that night. The FCT-125 has amazing control of colour for such a fast refractor. The disc of Mars was sharply defined and contrast good - the polar cap was obvious and in moments of good seeing, detail could be made out in the cap. The bad seeing prevented much detail on the surface being seen. From memory the image in the TOA130F was brighter. For a f/5.6 refractor aimed at imaging (the MF reducer brings the scope to 4.5 with a wide corrected field), this scope did very well on Mars. I'd like to test it again versus the C8 and TOA.

Overall, from these limited, poorly executed, subjective tests, I'd rank the scopes as follwing:

  1. TOA130F

  2. Celestron C11

  3. FCT-125

  4. C8

  5. Borg 125SD


The Borg 125SD is an f/6 doublet, so the lateral colour is no surprise. Despite this it was close to the C8's performance and had better contrast. I expect that if I do the comparison again on a GEM, the 125SD might be better overall. The 125SD is a great imaging scope when combined with the f/4 ED reducer - very wide, well corrected, flat and colour-free. It's a great all-round scope, incredibly light, very flexible due to the Borg system and has a "fun factor" that some scopes lack.

The C8 confirmed its reputation as a good planetary scope in a tiny lightweight package given good conditions and proper collimation. In my environment, it actually works quite well as a "quick peek" scope. The difference between the C8 and the TOA was not at all subtle. The TOA was far, far better. Seeing was too poor, and I didn't compare the FCT-125 versus another scope on the same night, so I'm less sure, but overall it did seem to outperform the C8, certainly there was more contrast, a sharper disk edge and less faffing around with focussing - despite it being f/5.6 and lacking a slow-motion focuser.

On the night I tested the C11 and TOA, I sometimes used a Baader Neodymium filter. This helps improve contrast on Mars. Stacking this with the Baader "fringe killer" improves contrast again, though only slightly. I also tried out a Mizar "mu" filter (Nebula filter) for a laugh, and was surprised that it actually improved contrast quite a bit!

Ironically, the good performance of the C8 has led to me wanting a Tak Mewlon 210 even more. So, I may sell the C8 and C11.

I stress that this was visual observing, where contrast and seeing are important. For planetary imaging, resolution and a bright image to get good SNR at larger image scales are important, and the C11 should easily be the best here. Stacking the good frames effectively allows you to tune seeing versus SNR.

As an aside, I recently purchased the Celestron Vibration Suppression Pads. I was dubious at first, but they really work well. I strongly recommend these.

2010-01-12

F*ck. Off. Samsung.

The way they are marketing their new NX-10 really sucks. If I were an engineer at Samsung who had worked on this project, I'd be heading down to marketing to slap some people around.

2010-01-04

At last: The Takahashi FCT-125

I am in Oita, Japan visiting relatives and have finally got my hands on my Tak FCT-125. I bought this unseen and had it delivered to my relatives here.

FCT-125

In order to try it out, and to have an equatorial mount I can use on visits, I picked up a Vixen GP mount and an AL-90 tripod for a good price from Yahoo auction.


Vixen GP

I intended to get a HAL-130 tripod, but couldn't get one delivered in time. The FCT-125 is a little over the capacity of this setup, but the GP seems to handle it well. I'm tempted to get motors so that I can do some imaging when I'm here.

The skies are fairly dark here, and last night the clouds cleared. Before the Moon rose, I got the best views of M42, M45 and the Milky Way around Auriga I have ever seen. Despite being low in the Sky, the "arms" of M42 extended to the edge of a Pentax XW20. M43 was easily visible with direct vision, the dark nebula between it and M42 also very evident. The core showed mottling and lots of detail was visible the arms and above (i.e. south of) the trapezium. I suspected some nebulosity around the Running Man nebula, but couldn't be sure. Rigel was easily split with a Meade Series 4000 15mm plossl, and a 5mm Ortho, despite the low elevation and fairly poor seeing.

The wide-field views of the Milky Way were stunning, with thousands of stars visible in one field of view.

Despite being over capacity, the GP worked perfectly well. I found an extra-long counter-weight shaft, also on Yahoo auction. This allows using less weight to balance the scope, and I was able to use just one 3.7kg weight. The AL-90 tripod is much smaller and lighter than the HAL-130. This would be a nice setup to use with mid-sized scopes for travel.

I didn't waste time faffing around with testing the optics. I'll wait until I'm back under Singapore's bright, muggy skies before doing that. There doesn't seem to be any immediately obvious problems and overall the scope appears to be near mint condition.

I also managed to find the f/4.5 reducer for the FCT. I'll try this out when I have time back home. Strangely, another brand new reducer turned up for sale a week after I bought mine.

I also got a Borg 1.04x 35mm flattener and 67 flattener, again from Yahoo auction and in excellent condition.