2010-08-08
Borg 71FL is pretty damn good
Here is a post with a photo that shows some Fresnel rings. I need to do a proper Roddier test, but it's looking pretty good.

2010-07-29

2010-07-19
Review of the Nikon 180/2.8 ED Ai-S
I think this is one of the best value lenses out there for widefield astrophotography. Jerry Lodriguss has put up a review of this lens on his blog, "Catching the Light". Check out his site for his very clear articles and books on beginning astrophotography.
QHY8 reprise
In a previous post, I wrote about the trouble I had with my QHY8.
So, I spent a bit of time fiddling with the QHY8 getting the CCD square to the front plate. I adjusted the rear screws and was able to get the CCD square according to my measurements. But no matter how I changed the tension, I couldn't see any difference in sample images - there was still frame-wide "coma" aligned with the CCD.
At first, I was making small adjustments to the height of the corners of the CCD - 0.2mm max. I decided to make gross movements instead, and didn't see any change in the test images. Aha! Something else is going on. It turned out to be "tearing" in the image introduced by software. The QHY8 is supported with a custom driver under Nebulosity on the Mac. Unfortunately, these seem to have some problems. After trying Nebulosity under Windows with the official QHY drivers, I finally got a very nice test image with a flat field. Nothing is perfect though, I have to reinstall the drivers frequently.
When playing around with the CCD alignment, I noticed that the cold finger the CCD is on is levered on one side. This is the side with one spacer on top of a component. I took out the screw I previously put on the right hand side, straightened the spacer and put it on the right hand side. When I reassembled the CCD, the CCD was pretty much perfectly aligned!
If the clouds of the past two months clear, hopefully I will get some imaging done with the QHY8.
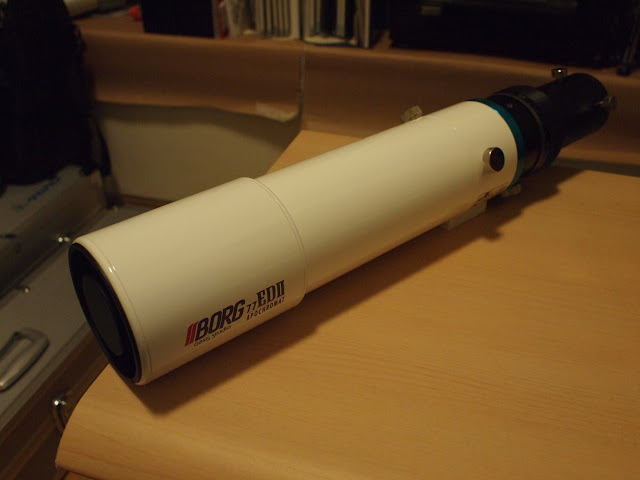
Borg 77EDII
Note
I originally wrote this post back in November 2009, and it has languished as a draft. Since then, I've added the 135mm tube (7135) that allows use of the f/4 ED reducer and the new 0.78DGT triplet reducer (7878).
My new Borg 77EDII (available from Hutech outside of Japan) arrived today from Starbase.

The 77EDII package (6000 and 2178) comes with a drawtube, helical focusser, two M57 extension tubes (7509, 7508) that also allow use of 2" accessories, and a T-ring adapter (7522). The tube has a clever flat mount area that can be used to attach the scope to a tripod, or to attach a finder mount or other accessories.

Both the tube and the lens assembly come with caps for use when the scope is broken down for transport. Nice. I would've liked these for my 125SD - there is not even the option to buy them separately. The lens cell doesn't appear to be adjustable, but looks like it will accept 77mm filters (note it doesn't, you can use 82mm filters if you take the nameplate off, see here). The lens hood is retractable, but doesn't slide into place with a satisfying click, as the Pentax 75SDHF does, or have a screw to hold it in place, like the Tak Sky-90 and FSQ-85ED. However, the hood is small and light, so I don't think it being held in place by friction will be a problem.

In addition I bought the 80mm rings (7080), the plastic clamshell (5503) and a Vixen-style finder mount (7755n). I also added one accessory that currently seems to be available only in Japan, the Yuetsu-27g base ring from Scopelife. This is the well-machined (カワセミ or "Kingfisher") blue ring in the photos. This provides a tighter fit around the extensible draw tube and reduces sag. I became aware of this accessory through the Borg "topics" blog (Japanese). Note the blog is now at http://www.tomytec.co.jp/borg/world/blog/.

The flexibility and value for money of Borg scopes and accessories seems to increase the more you buy. I can use the M57 FeatherTouch focusser and MDX "helicoid" with ED F4DG reducer for my 125SD on the 77EDII with no problem. I think I can also use the 0.85x DG (7885) and 0.66x DGT (7866) reducers for the mini-Borg series that I have for use with my 60ED. Both of these reducers are usable up to 500mm focal length, only cover an APS-C sized sensor, but have the advantage of being tiny.
Compare this to my Taks. I have a 35mm reducer, (separate) 35mm flattener and 1.6x extender specific to the TOA-130/150, the 0.73 reducer ED and 1.5 extender ED for the FSQ-ED and Sky-90 reducer and Extender-Q for the Sky-90 and FSQ. To be fair, the extenders can all be used with other scopes - I think. And with some ingenuity some of the reducers can be used on other scopes, but not easily.
With the F4DG reducer, the focal length of the 77EDII is around 330mm at f/4.3. On a 35mm full frame this is just over 6 by 4 degrees, with a 7.5 degree diagonal. This should provide nice wide-field images. For H-alpha, the Olympus 250/2 and 250/2.8 have the advantage of speed, though at the cost of weight. The Pentax 645 300/4 provides a comparable FOV at a comparable weight, but the Borg's flexibility would have it win for a trip. Anyway, it will be fun to try them out and compare.
I missed out on the Borg 0.85x DGL reducer/ (7887) for 35mm full-frame, so will wait and pick up the 0.78x triplet reducer when it becomes available. I recently managed to find the fairly rare 35mm 1.04x flattener (7784) on Yahoo Auction in Japan, which I will pick up over the New Year holiday. This set of reducers/flatteners will give 330, 395 and 530mm focal lengths on a full 35mm frame. Surely in terms of flexibility, this has to be one of the best small portable photo-visual refractors available?
The 77EDII is pretty large compared to the 60ED when assembled.
I originally wrote this post back in November 2009, and it has languished as a draft. Since then, I've added the 135mm tube (7135) that allows use of the f/4 ED reducer and the new 0.78DGT triplet reducer (7878).
My new Borg 77EDII (available from Hutech outside of Japan) arrived today from Starbase.

The 77EDII package (6000 and 2178) comes with a drawtube, helical focusser, two M57 extension tubes (7509, 7508) that also allow use of 2" accessories, and a T-ring adapter (7522). The tube has a clever flat mount area that can be used to attach the scope to a tripod, or to attach a finder mount or other accessories.

Both the tube and the lens assembly come with caps for use when the scope is broken down for transport. Nice. I would've liked these for my 125SD - there is not even the option to buy them separately. The lens cell doesn't appear to be adjustable, but looks like it will accept 77mm filters (note it doesn't, you can use 82mm filters if you take the nameplate off, see here). The lens hood is retractable, but doesn't slide into place with a satisfying click, as the Pentax 75SDHF does, or have a screw to hold it in place, like the Tak Sky-90 and FSQ-85ED. However, the hood is small and light, so I don't think it being held in place by friction will be a problem.

In addition I bought the 80mm rings (7080), the plastic clamshell (5503) and a Vixen-style finder mount (7755n). I also added one accessory that currently seems to be available only in Japan, the Yuetsu-27g base ring from Scopelife. This is the well-machined (カワセミ or "Kingfisher") blue ring in the photos. This provides a tighter fit around the extensible draw tube and reduces sag. I became aware of this accessory through the Borg "topics" blog (Japanese). Note the blog is now at http://www.tomytec.co.jp/borg/world/blog/.

The flexibility and value for money of Borg scopes and accessories seems to increase the more you buy. I can use the M57 FeatherTouch focusser and MDX "helicoid" with ED F4DG reducer for my 125SD on the 77EDII with no problem. I think I can also use the 0.85x DG (7885) and 0.66x DGT (7866) reducers for the mini-Borg series that I have for use with my 60ED. Both of these reducers are usable up to 500mm focal length, only cover an APS-C sized sensor, but have the advantage of being tiny.

Compare this to my Taks. I have a 35mm reducer, (separate) 35mm flattener and 1.6x extender specific to the TOA-130/150, the 0.73 reducer ED and 1.5 extender ED for the FSQ-ED and Sky-90 reducer and Extender-Q for the Sky-90 and FSQ. To be fair, the extenders can all be used with other scopes - I think. And with some ingenuity some of the reducers can be used on other scopes, but not easily.
With the F4DG reducer, the focal length of the 77EDII is around 330mm at f/4.3. On a 35mm full frame this is just over 6 by 4 degrees, with a 7.5 degree diagonal. This should provide nice wide-field images. For H-alpha, the Olympus 250/2 and 250/2.8 have the advantage of speed, though at the cost of weight. The Pentax 645 300/4 provides a comparable FOV at a comparable weight, but the Borg's flexibility would have it win for a trip. Anyway, it will be fun to try them out and compare.
I missed out on the Borg 0.85x DGL reducer/ (7887) for 35mm full-frame, so will wait and pick up the 0.78x triplet reducer when it becomes available. I recently managed to find the fairly rare 35mm 1.04x flattener (7784) on Yahoo Auction in Japan, which I will pick up over the New Year holiday. This set of reducers/flatteners will give 330, 395 and 530mm focal lengths on a full 35mm frame. Surely in terms of flexibility, this has to be one of the best small portable photo-visual refractors available?
The 77EDII is pretty large compared to the 60ED when assembled.
Borg 2010X2 is a 71mm fluorite
The new Borg 71 FL is out. It can be used with the mini-Borg tubes/accessories as well as the 80mm diameter tubes. The first batch of 100 has nearly sold out already. I lasted all of two days without ordering one.
It's 400mm f/5.6. With the 0.66 DGT reducer, this will be 264mm @ f3.72, roughly 4.8 by 3.2 degrees on an APS-C sensor. With the 0.85 DG reducer, 340mm @ f/4.69, which is 3.7 by 2.5 degrees.
It's 400mm f/5.6. With the 0.66 DGT reducer, this will be 264mm @ f3.72, roughly 4.8 by 3.2 degrees on an APS-C sensor. With the 0.85 DG reducer, 340mm @ f/4.69, which is 3.7 by 2.5 degrees.
2010-06-04
More Mizar Mystery Mini Mount Mods
So, last night I bought a socket set, including a 17mm socket allowing me to fully disassemble the RA shaft on the Mizar mini-mount. The shaft is straight, but the hole in the Dec unit that the RA shaft screws into is at a slight angle. After cleaning the head of the shaft, it was clear there was some old washer/shim that had deteriorated over time.
I tried some rubber and metal washers, but didn't have any luck. I then made a shim from aluminium foil. This worked well when I screwed the shaft in by hand. I cleaned and greased everything and reassembled the mount, but there was no improvement! After some swearing and then a bit of investigation, I realised tightening the shaft hard torn the foil shim and spread it out.
After a bit of thinking, I realised the opposite of shimming was to remove material. So, the opposite opposite (i.e. same) effect could be achieved by filing down the base of the shaft opposite to where I had placed the shim, and also angling the sides perpendicular to this. I did this gradually, frequently checking the angle after some filing by screwing the shaft in tightly. I could see an improvement and eventually got it pretty straight. I filed off about 0.5mm.
I then cleaned and greased the RA shaft, greased the worm wheel and put it all back together. The RA shaft is now quite square to the Dec unit. Previously the RA circles were being pinched by the Dec unit due to the misalignment and could get stuck in place instead of moving with the RA shaft. This is now fully fixed, and the action of the RA setting circle is good - smooth and loose enough to move easily, but with enough stiction not to slip. So, now I have more accurate "push-to". The new grease improved rotation about the RA shaft itself, and is now very smooth.
The RA shaft has a simple but effective little "bearing". It is just 4 washers, with grease between each, behind the bolt holding the shaft in place. Re-greasing these led to smoother rotation and the ability to tune the shaft tension more finely.
Looking at the Orion site, the EQ-2 mount seems to be similar to this mount. Mizar had a smaller mount that the EQ-2 looks very, very similar to. My little mount is a bit more sturdy at the same weight. If you are having problems with an EQ-2 mount, it may be worth pulling it apart to check if the RA shaft is misaligned rather than bent. Obviously this is at your own risk.
Unfortunately I forgot to take photos of the disassembled mount and tear-down/rebuild process. It's very simple. The mount is nicely engineered apart from this misalignment.
I cleaned the whole mount with WD-40 and all the chromed parts with Brasso. It's looking pretty good:

On the near side of the RA unit, you can see, from left to right, a chrome bolt, a lever and a gear. This is clearer in a photo from the auction:

It seems likely that the chrome bolt is there to mount an optional RA motor drive, with the lever for some mechanism to (dis)engage the smaller gear(s) that would connect to the large gear.
You can also see the Dec knob points down towards the rear. So, when the mount is moved around RA, the Dec knob collides with the gear. Removing the lever and gear helps, but the Dec handle still collides with the RA worm shaft. Unlike other mounts, the Dec handle does not rotate with the Dec shaft, so this collision happens regardless of Dec.
Also, on the other side, again in a photo from the auction, you can see the RA knob:

Again, the RA worm shaft does not rotate with the RA shaft, but remains in place. This protudes quite a way, and the Dec worm shaft collides with it when rotating the RA shaft in the opposite direction.
Removing the chrome gear revealed that the inside of the worm shaft was threaded for an M4 bolt. This makes it possible to use a different knob to turn the shaft. The Dec worm shaft didn't look to be threaded, but after screwing a bolt in with some WD-40, it was clear that it too is threaded for M4.
I upgraded my Takahashi TOA130F with the MEF-4 micro focuser, and my Sky-90 with the MEF-3 micro focuser, so I had two spare Takahashi focusser knobs. I got some M4 nuts and bolts from a local hardware store and attached the Tak knobs:


Now there is complete clearance to rotate the mount fully in both RA and Dec. The only limiting factor is the telescope itself, but now I can track past meridian, and the mount is easier to use.
The other major modification I can think of would be to add a motor. To do this, I need to re-attach the gear and mount the motor on the rhs. Fortunately the RA and Dec worm assemblies are asymmetric. If I swapped them, I would be able to have the Tak knobs on the other side, allowing me to have a motor on the rhs.
The mount has fairly simple bushings, which could be improved by teflon bushings, but it's already very smooth.
I was able to use the mount for a short while last night to find some doubles in the haze between the clouds with a Pentax 75-SDHF. It is very rigid, with damping times less than 0.5 seconds, without the use of any damping pads. I'm not very practiced with old-fashioned setting circles, but I was able to find targets far (greater than 10 degrees) from nearby bright stars that were not visible to the naked eye. Scanning RA in the finder and at low powers, and using binoculars to get context also helps. Each goto is more effort and a bit slower than with an automatic mount but the set up time is minimal, so I can spend more precious time before the clouds come in.
So, this old, cheap little mount is now back in good condition and very usable.
I tried some rubber and metal washers, but didn't have any luck. I then made a shim from aluminium foil. This worked well when I screwed the shaft in by hand. I cleaned and greased everything and reassembled the mount, but there was no improvement! After some swearing and then a bit of investigation, I realised tightening the shaft hard torn the foil shim and spread it out.
After a bit of thinking, I realised the opposite of shimming was to remove material. So, the opposite opposite (i.e. same) effect could be achieved by filing down the base of the shaft opposite to where I had placed the shim, and also angling the sides perpendicular to this. I did this gradually, frequently checking the angle after some filing by screwing the shaft in tightly. I could see an improvement and eventually got it pretty straight. I filed off about 0.5mm.
I then cleaned and greased the RA shaft, greased the worm wheel and put it all back together. The RA shaft is now quite square to the Dec unit. Previously the RA circles were being pinched by the Dec unit due to the misalignment and could get stuck in place instead of moving with the RA shaft. This is now fully fixed, and the action of the RA setting circle is good - smooth and loose enough to move easily, but with enough stiction not to slip. So, now I have more accurate "push-to". The new grease improved rotation about the RA shaft itself, and is now very smooth.
The RA shaft has a simple but effective little "bearing". It is just 4 washers, with grease between each, behind the bolt holding the shaft in place. Re-greasing these led to smoother rotation and the ability to tune the shaft tension more finely.
Looking at the Orion site, the EQ-2 mount seems to be similar to this mount. Mizar had a smaller mount that the EQ-2 looks very, very similar to. My little mount is a bit more sturdy at the same weight. If you are having problems with an EQ-2 mount, it may be worth pulling it apart to check if the RA shaft is misaligned rather than bent. Obviously this is at your own risk.
Unfortunately I forgot to take photos of the disassembled mount and tear-down/rebuild process. It's very simple. The mount is nicely engineered apart from this misalignment.
I cleaned the whole mount with WD-40 and all the chromed parts with Brasso. It's looking pretty good:

On the near side of the RA unit, you can see, from left to right, a chrome bolt, a lever and a gear. This is clearer in a photo from the auction:

It seems likely that the chrome bolt is there to mount an optional RA motor drive, with the lever for some mechanism to (dis)engage the smaller gear(s) that would connect to the large gear.
You can also see the Dec knob points down towards the rear. So, when the mount is moved around RA, the Dec knob collides with the gear. Removing the lever and gear helps, but the Dec handle still collides with the RA worm shaft. Unlike other mounts, the Dec handle does not rotate with the Dec shaft, so this collision happens regardless of Dec.
Also, on the other side, again in a photo from the auction, you can see the RA knob:
Again, the RA worm shaft does not rotate with the RA shaft, but remains in place. This protudes quite a way, and the Dec worm shaft collides with it when rotating the RA shaft in the opposite direction.
Removing the chrome gear revealed that the inside of the worm shaft was threaded for an M4 bolt. This makes it possible to use a different knob to turn the shaft. The Dec worm shaft didn't look to be threaded, but after screwing a bolt in with some WD-40, it was clear that it too is threaded for M4.
I upgraded my Takahashi TOA130F with the MEF-4 micro focuser, and my Sky-90 with the MEF-3 micro focuser, so I had two spare Takahashi focusser knobs. I got some M4 nuts and bolts from a local hardware store and attached the Tak knobs:


Now there is complete clearance to rotate the mount fully in both RA and Dec. The only limiting factor is the telescope itself, but now I can track past meridian, and the mount is easier to use.
The other major modification I can think of would be to add a motor. To do this, I need to re-attach the gear and mount the motor on the rhs. Fortunately the RA and Dec worm assemblies are asymmetric. If I swapped them, I would be able to have the Tak knobs on the other side, allowing me to have a motor on the rhs.
The mount has fairly simple bushings, which could be improved by teflon bushings, but it's already very smooth.
I was able to use the mount for a short while last night to find some doubles in the haze between the clouds with a Pentax 75-SDHF. It is very rigid, with damping times less than 0.5 seconds, without the use of any damping pads. I'm not very practiced with old-fashioned setting circles, but I was able to find targets far (greater than 10 degrees) from nearby bright stars that were not visible to the naked eye. Scanning RA in the finder and at low powers, and using binoculars to get context also helps. Each goto is more effort and a bit slower than with an automatic mount but the set up time is minimal, so I can spend more precious time before the clouds come in.
So, this old, cheap little mount is now back in good condition and very usable.
Subscribe to:
Posts (Atom)